In this task, I will be going over some techniques that are used in Photography. These techniques can be done both with negatives and with photographic prints. I will mainly be focusing on conventional methods rather than digital, however most of these techniques can be done on Photoshop too.
Part 1:
Internet Research
Part 1:
Internet Research
 |
| Simple Example |
Double Exposure
This is a conventional example of double exposure. It can be done using a double exposure featured button on some old film cameras. This is a very common technique even up to this date with some simple skills of Photoshop. This example could be taken taking 1 shot then exposing it again elsewhere. Or even easily can be done on Photoshop by placing both images on top via layers then changing the opacity of the top layer. I think this could be effective to show a contrast of two things. Or it could be communicating a message using two similar themed images. It's pretty straightforward and I think it can be taken to a extremely creative level.
 |
| More Advanced |
This is more of a digital example. I like the creativity in this example, stands out more than a basic double exposure. This is much more graphical and complicated to make. It required an first image to create a shape for example the woman and the tree that overlays. After seeing this type of double exposure at a creative level, I felt to recreate my own example.
 |
| My example on Photoshop |
This is a similar example of using an individual as the shape/silhouette made out of tree barks. I think it looks pretty cool because it almost looks like veins and it could be represented as the insides of humans or something along the line. I think there can be various meanings behind the image. But staying on topic, you can see how the head and ears are shaped around this tree image. If I was to put more hours into such experiments, I think it would be great to push extents and see what else I could make alongside the graphic element.
 |
| Sandwich Negatives |
Sandwich Negatives
This technique is very similar to double exposure. It is usually done in a conventional method where you place two negatives together and expose the image. It is a very practical technique and it allows you to create this double exposure image without having to do it on a camera. I like this example because you can see a female but there's also waves over her. This is a technique that is quite similar to overlaying textures too.
 |
| Scratching Negatives |
Scratching Negatives
This technique gives your image this scratched and gritty look. There are two ways of conducting this effect. You can either scratch the negatives or scratch the print with something sharp. I like the effect that this gives. I think it can be used in a creative ways and it's better to scratch the print in my opinion because you can physically feel the rough textures.
 |
| Burning Negatives |
Burning Negatives
The image above is an example of burned negatives. Like previously, you can either burn the negatives or burn your printed image. Well this technique gives you this burned look and sometimes distorts your image. You can select which bits of you choose to burn and it would give you this burnt look on the edges. Also, depending on the paper you use, it can change the colour tones and give you all sorts of effects.
 |
| Painting with Developer |
Painting with Developer
This technique gives you the chance to take be creative and express yourself. To create an image like this, you would usually expose an image to photographic paper. Then you'd use a brush with the developer and paint what you want. Then you'd continue with the same process with the stop. I really liked seeing examples of this technique because some pieces of work look very advanced and very precise with where they chose to paint the developer. I suppose the outcome of this technique is not to reveal all and that opens up so many interpretations.
 |
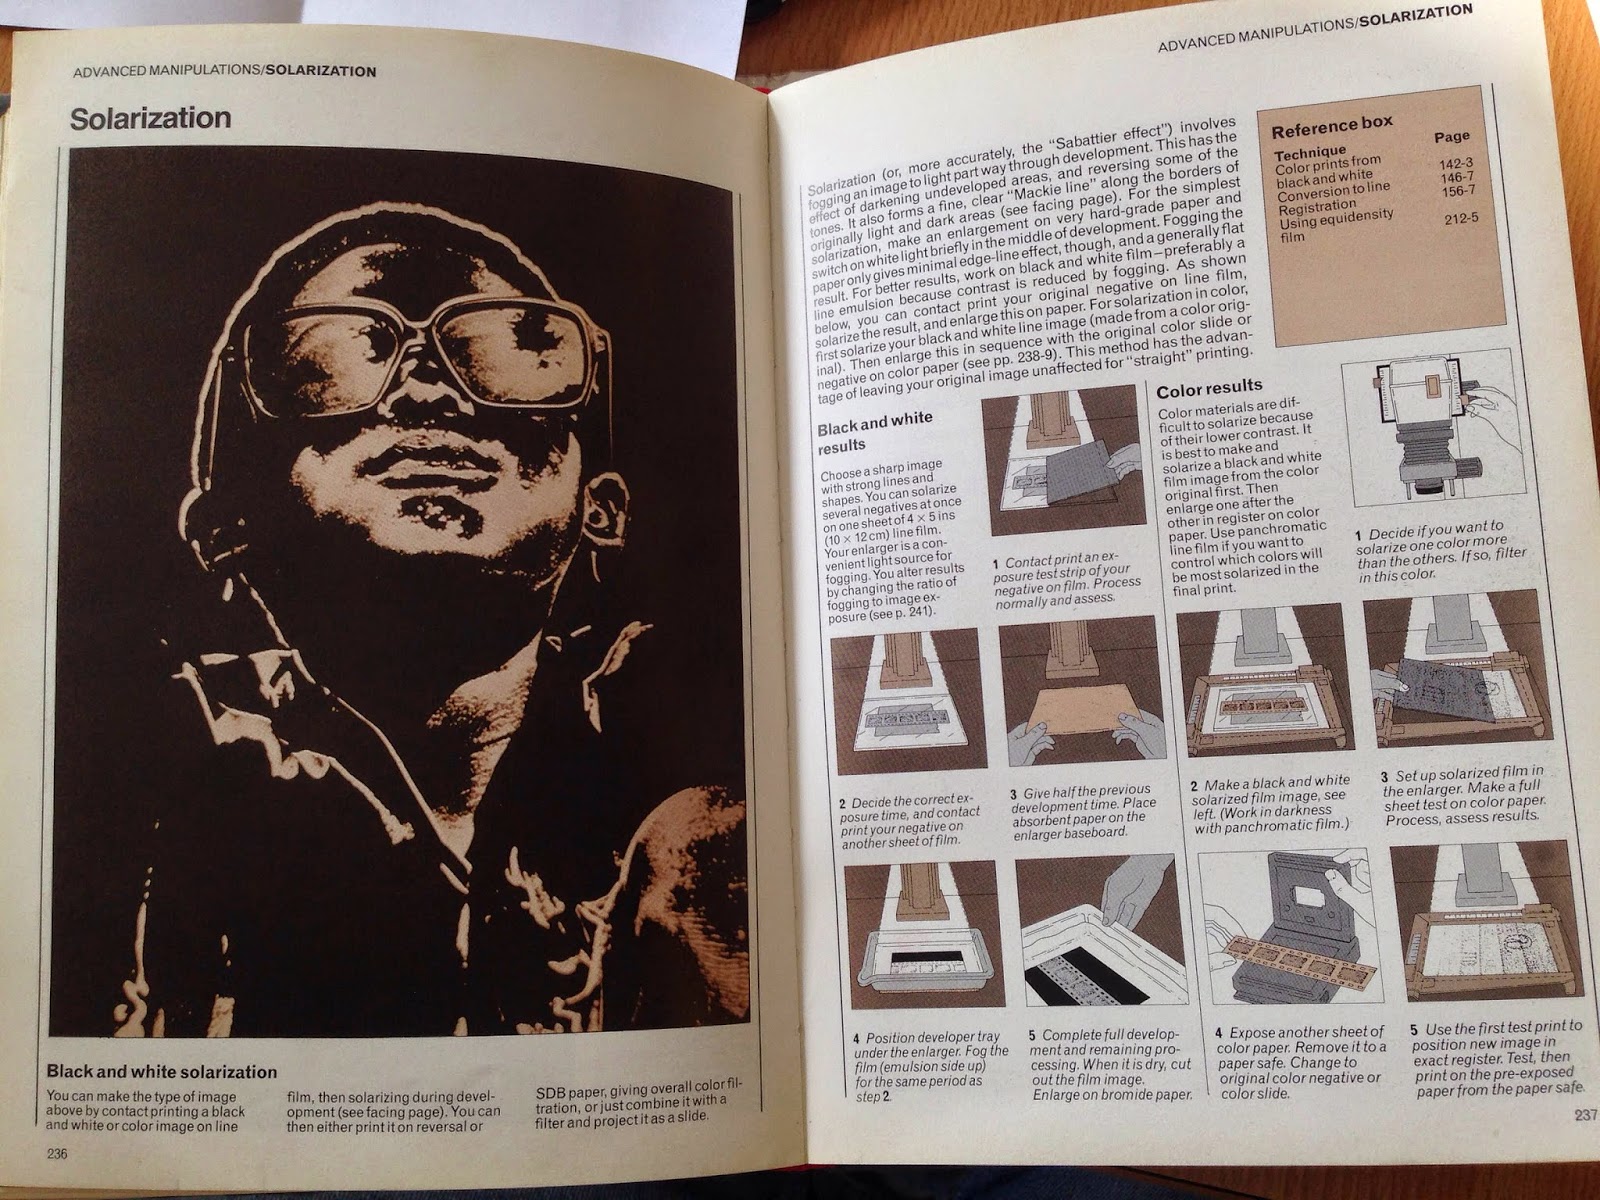
| Solarization |
Solarization
 |
| Overlaying Texture |
Overlaying Textures
This technique can be done both conventionally and digitally. It's when you overlay textures that gives your image an alternative effect. So for instance, you can take an image of a rough texture and use Photoshop to overlay that on to your subject. Or if you are in the darkroom, you can either sandwich your image with a texture image or go to an extent of stitching something physical on your image to add texture. I think this technique can give your image different effects and also different messages in comparison to the original image.
 |
| Photograms |
Photograms
This technique is fairly easy but the creativity can be endless. It's when you place an object over photographic paper and expose light on to your paper. That's how it leaves you this effect where it gives you the shape of the object. Putting this in context with some actual images from negatives, placing the object will just not let that bit of the image expose and you'll only be able to see the shape of that object.
 |
| Image Weaving |
Image Weaving
I've kind of touched on this technique when I've said you can stitch on images. Well this is a similar technique. It is when you print multiple prints of the same image. Then you'd cut out equal sized strips and start weaving it inwards and outwards. In the end, you should end up with your image pretty much visible.
 |
| Painting on Images |
Painting on Images
This technique is rather straightforward. It is when you physically paint on an image that is printed on photographic paper. I think it's creative and it could be used in so many ways. It can be used for manipulation or to just simply give it some bold eye-catching colours. I think it's quite fascinating especially on a black and white print. It's also another technique that allows you to be expressive and must require some patience with the painting skills.
--------------------------------------------------------------------------------------
Library Research:
Here are some images I've taken from a book called The Darkroom Handbook. This book helped me in this research task. There are some examples of the techniques and it also specifies what each technique and how to you could use it.


--------------------------------------------------------------------------------------
Part 2:
Artist References
Artist References
Timothy Pakron


Timothy Parkon is a visual artist who does experimental techniques in the darkroom. Also specialises in work using oil painting. He is from New York and his work is pretty creative. I've specifically selected these two images because I think they demonstrate the painting with developer technique in a creative way. I like the use of brush strokes because it gives this dramatic effect as if the person is melting away. There's just something to it that catches our attention because there's this form of surrealism and it's clever in the selections that he has chosen to paint with because the rest of the image is not exposed.
Charlotte Caron


Charlotte Caron is a French artist who is known for painting animals onto some photography. These examples here shows how she would turn a normal image and manipulate the face with some paint work. If you haven't guessed already, this is an artist reference for painting on images. It's not quite related to darkroom image but the same principals are here. I like the fox image because if you look closely, you can see the rough brush strokes that is overlaying on the image. I think the technique can be creative and it can also be very expressive.
Man Ray


May Ray created these photograms back around 1920's. He used to call them Rayographs. He created these images without a camera by placing objects on a sheet of photographic paper and exposing it to light. Bear in mind, those times also had photography of everyday objects so this technique was unique and has inspired many others to discover into the surrealist path. I like the technique because it just gives you the silhouette shape of the object without revealing any details like a normal image would. In this first example, he has used some coil of wire. Whereas the second example is more of an abstract photogram. Personally, this is his idea of taking a basic photogram to a creative level where you use other techniques like abstract and combining it together.
Overall, I think some of these techniques are very creative and these examples have visually given me a taste of what my images will be like. Hopefully I get the chance to explore all techniques and see the link on what the effect of the techniques has on old architecture.
No comments:
Post a Comment